Installing the agent
This page explains how to install bor-agent on a Linux desktop, point it at
your server, enroll it into a node group and start it. It covers the
Deploy agent wizard in the web UI, setting up the package repository by
hand, installing a downloaded package, the agent configuration file,
re-enrollment, and tips for deploying many machines.
How agent installation works
Every Bor server ships the bor-agent packages for all supported platforms
and serves them itself on its web port under https://bor.example.com/agent/
(add :8443 if the server still uses the default port):
| URL | Content |
|---|---|
/agent/ |
A short instructions page. |
/agent/ca.crt |
The server's internal CA certificate (PEM). |
/agent/repo-key.asc |
The public key that signs the repositories. |
/agent/deb/ |
An apt repository with the .deb packages. |
/agent/rpm/ |
A dnf / zypper repository with the .rpm packages. |
/agent/apk/, /agent/arch/ |
Alpine and Arch packages for direct download. |
/agent/manifest.json |
Version, signing state and SHA-256 checksum of every file. |
These URLs are public (no login), because package managers on the desktops cannot authenticate. Desktops therefore need no internet access: they install and later upgrade the agent from your Bor server. The server always serves the agent version that belongs to its own release.
Installing an agent takes four steps:
- Trust the server's CA (only when the server uses its internal CA).
- Install the
bor-agentpackage. - Point
/etc/bor/config.yamlat the server and enroll with a one-time token. - Enable and start the
bor-agentservice.
The Deploy agent wizard generates a script that does all four.
Before you begin
- The server is installed and reachable from the desktop by the name in its certificate. See Requirements.
- A node group exists for the desktop. See Node groups.
- You have root access on the desktop.
- Each desktop has a unique host name. The host name becomes the node name, and the server refuses to enroll a second node with the same name.
Install with the Deploy agent wizard
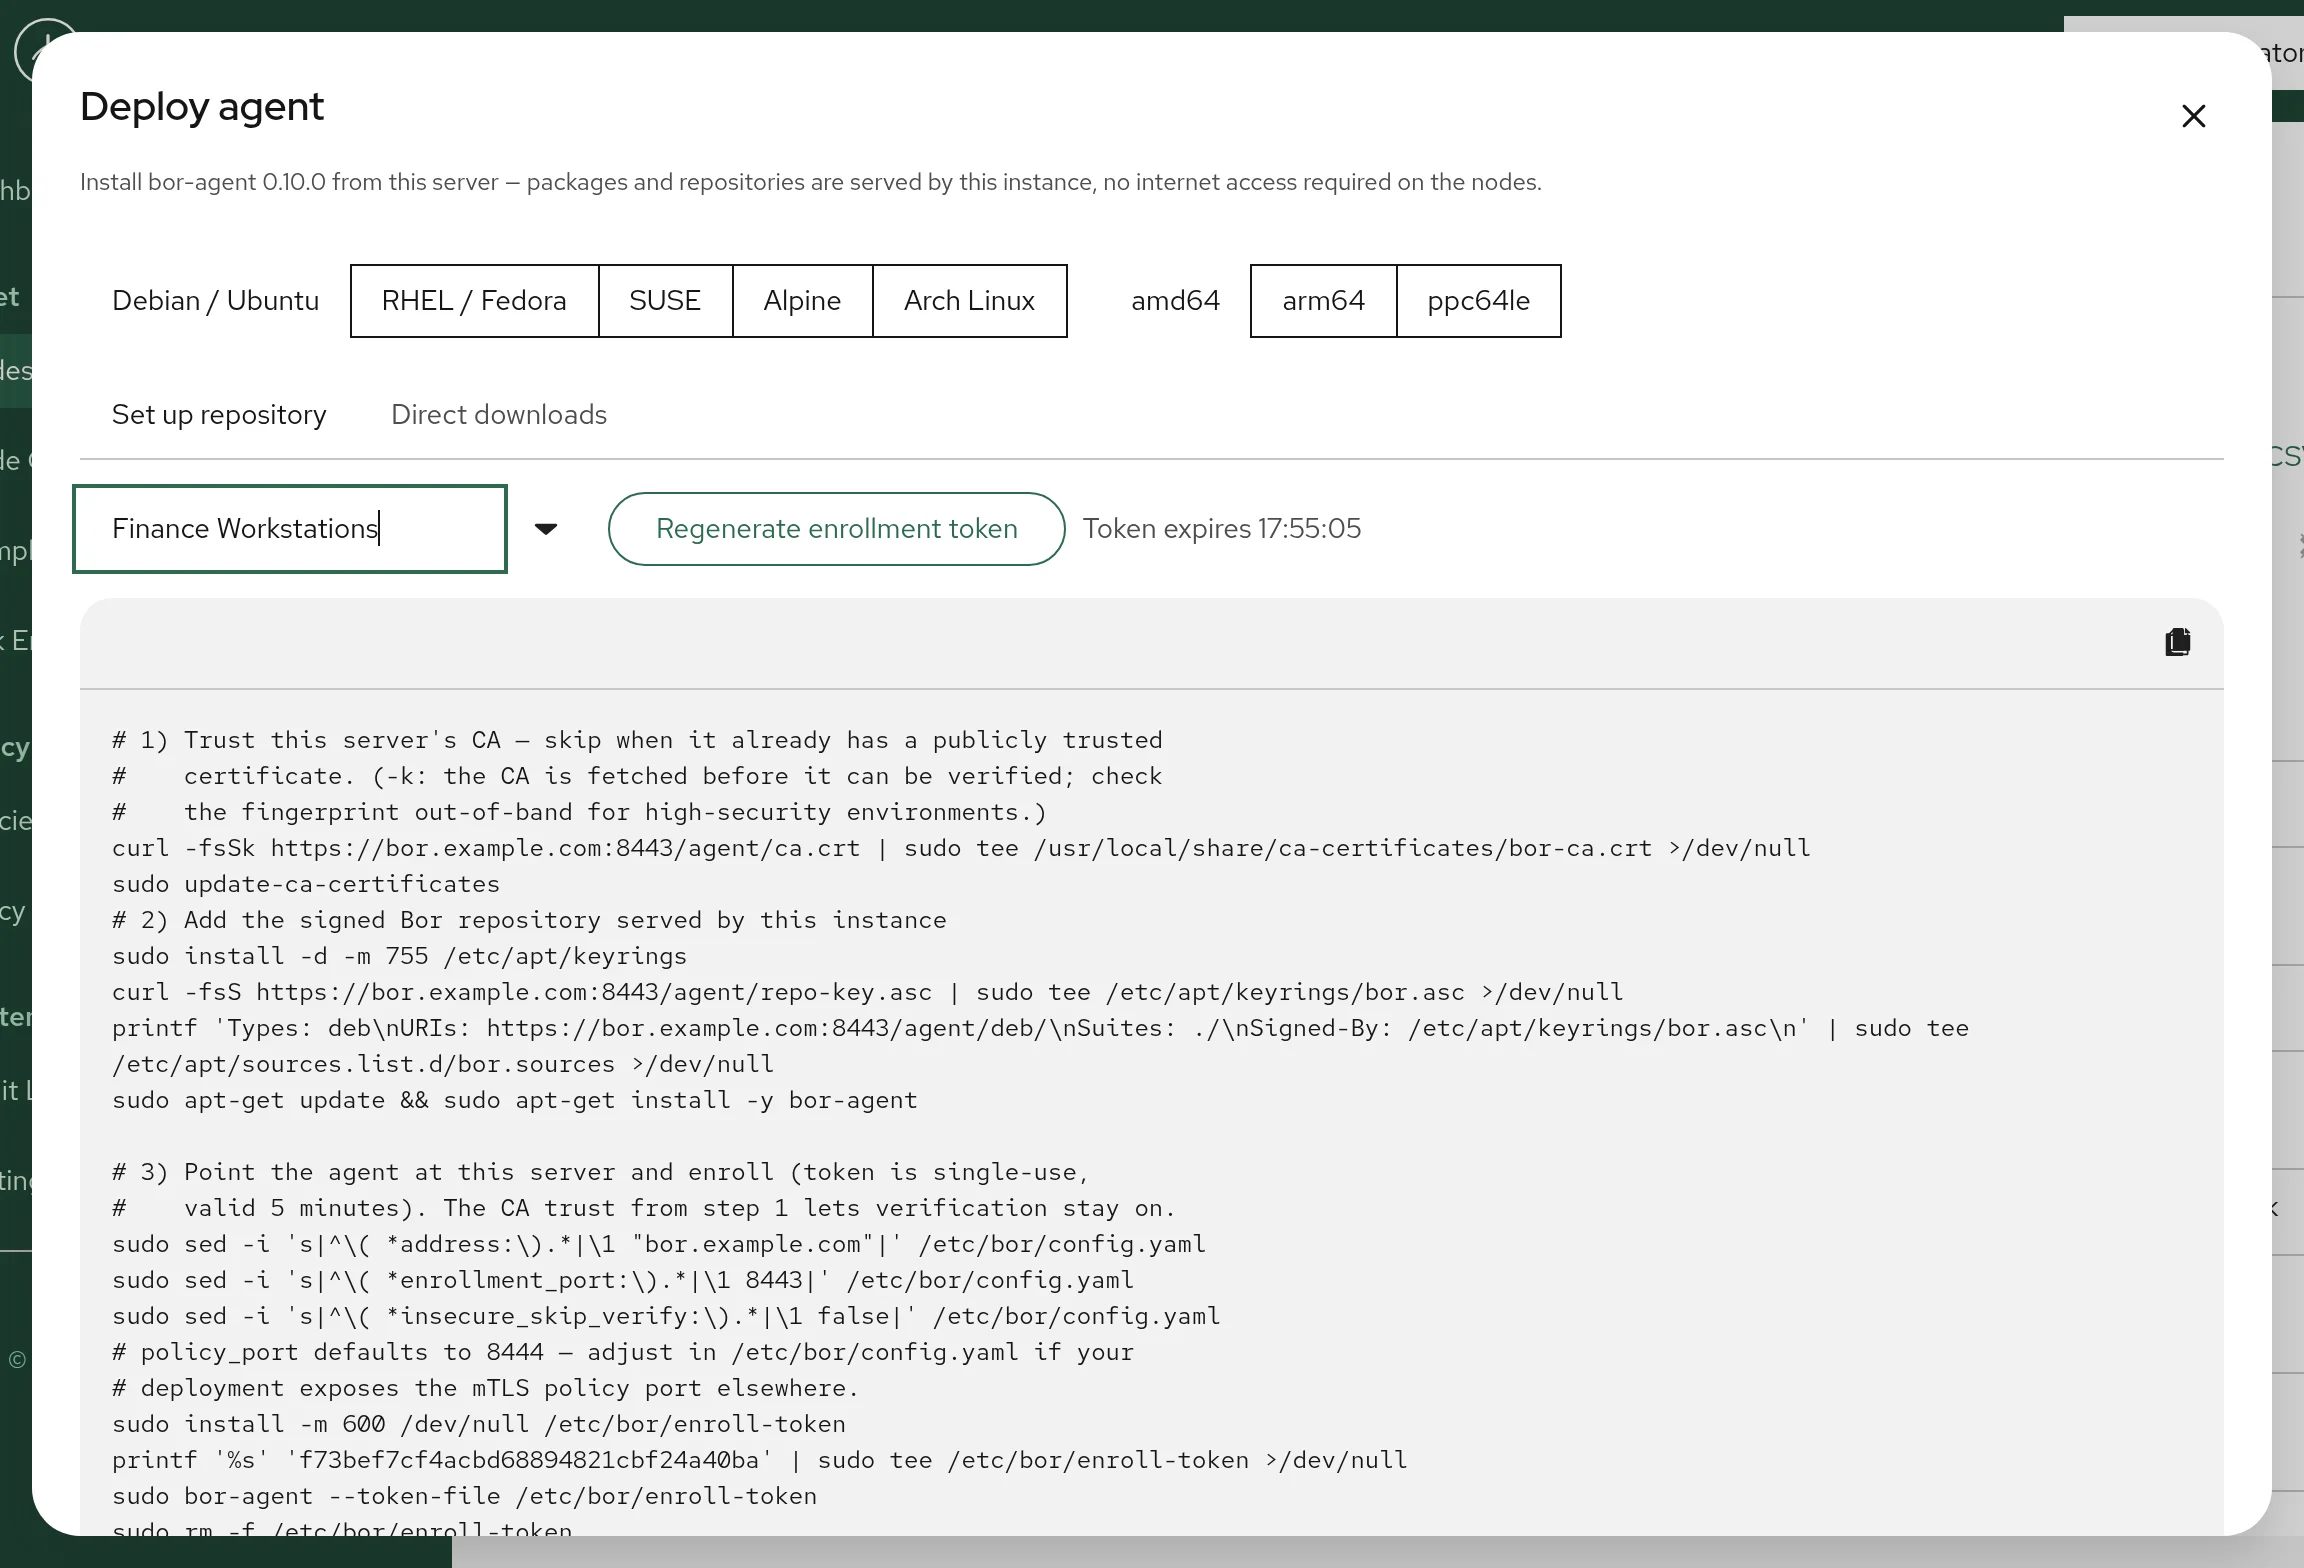
-
In the web UI, open the wizard in one of two ways:
- the Deploy agent button on the Nodes page, or
- the download icon in the top bar.
If neither is visible, your account lacks the
node:viewpermission or the server package does not include the agent repository (check the server log forAgent package repo: disabled). -
Select the desktop's platform: Debian / Ubuntu, RHEL / Fedora, SUSE, Alpine or Arch Linux.
- Select the architecture: amd64, arm64 or ppc64le.
- Optional but recommended: in Enroll into node group..., select the
node group and click Add enrollment step. The wizard generates a
one-time token and appends the enrollment commands to the script. The
token expires after 5 minutes (the expiry time is shown next to the
button) and can be used only once. Click
Regenerate enrollment token for a fresh one. This option requires the
node_group:viewandnode_group:createpermissions. - Click the copy icon on the script and run it in a shell on the desktop.
The generated script:
- Downloads
/agent/ca.crtand adds it to the system trust store. This first download usescurl -kbecause the CA cannot be verified before it is trusted; skip this step if the server has a publicly trusted certificate. - Adds the signed repository served by your server and installs
bor-agent(Debian/Ubuntu, RHEL/Fedora, SUSE), or downloads and installs the package directly (Alpine, Arch). - With the enrollment step: sets
server.addressandserver.enrollment_portin/etc/bor/config.yamlto the address you used to open the web UI (a URL without a port, such ashttps://bor.example.com, givesenrollment_port443), setsinsecure_skip_verifytofalse, writes the token to a root-only file, runsbor-agent --token-file /etc/bor/enroll-token, deletes the token file and runssystemctl enable --now bor-agent.
The Direct downloads tab lists the individual package files for the selected architecture with their sizes and SHA-256 checksums.
Note
A warning in the wizard means either that the packaged agent version differs from the server version, or that the repository is unsigned (development builds). Release packages are signed.
Set up the repository by hand
Use these commands to script installations yourself, for example in a
configuration management tool. Replace bor.example.com with your
server's address. If the server uses a web port other than 443, for
example the default 8443, write it as bor.example.com:8443.
Trust the server CA
Skip this when the server uses a certificate from a publicly trusted CA.
Warning
The CA download skips TLS verification (-k). In high-security
environments, compare the fingerprint
(openssl x509 -in <file> -noout -fingerprint -sha256) with the
fingerprint of /var/lib/bor/pki/ca/ca.crt on the server, or distribute
the CA certificate through your own trusted channel.
Add the repository and install the agent
sudo install -d -m 755 /etc/apt/keyrings
curl -fsS https://bor.example.com/agent/repo-key.asc | sudo tee /etc/apt/keyrings/bor.asc >/dev/null
printf 'Types: deb\nURIs: https://bor.example.com/agent/deb/\nSuites: ./\nSigned-By: /etc/apt/keyrings/bor.asc\n' \
  | sudo tee /etc/apt/sources.list.d/bor.sources >/dev/null
sudo apt-get update && sudo apt-get install -y bor-agent
cat <<EOF | sudo tee /etc/yum.repos.d/bor.repo >/dev/null
[bor]
name=Bor Agent
baseurl=https://bor.example.com/agent/rpm/
enabled=1
gpgcheck=0
repo_gpgcheck=1
gpgkey=https://bor.example.com/agent/repo-key.asc
EOF
sudo dnf install -y bor-agent
The repository metadata is signed (repo_gpgcheck=1); the metadata
carries the SHA-256 checksum of every package.
Alpine and Arch have no hosted repository; download the package
directly. Look up the exact file name in
https://bor.example.com/agent/manifest.json or on the
Direct downloads tab of the wizard.
The package is not signed with an Alpine key; its integrity is protected by the TLS connection to your server.
No OpenRC service is shipped
The package installs only a systemd unit. On Alpine create an OpenRC
service for /usr/bin/bor-agent yourself. The agent must run as
root.
Install a downloaded package instead
If you prefer, download bor-agent from the
GitHub releases or
getbor.dev/download and install the file
with your package manager, exactly like the server package (for example
sudo apt install ./bor-agent_VERSION_amd64.deb). Use the same version as
your server. Agents installed this way are not upgraded automatically by
apt or dnf, because no repository is configured.
What the package installs
| Path | Purpose |
|---|---|
/usr/bin/bor-agent |
Agent binary. |
/etc/bor/config.yaml |
Configuration, mode 0600. Marked as a configuration file, so upgrades keep your changes. |
/lib/systemd/system/bor-agent.service |
systemd unit. Runs the agent as root and restarts it on failure after 30 seconds. |
/var/lib/bor/agent/ |
Enrollment data: agent certificate, private key and CA certificate (mode 0750). |
The package recommends cryptsetup and suggests clevis-luks,
clevis-dracut and tpm2-tools for the disk encryption policy type. The
installation script only reloads systemd; it does not start the agent.
Configure the agent
Edit /etc/bor/config.yaml. The minimal settings are in the server
section:
server:
  address: "bor.example.com"
  enrollment_port: 443     # must equal the server's server.enrollment_port
  policy_port: 8444
  insecure_skip_verify: false

agent:
  client_id: ""

enrollment:
  data_dir: "/var/lib/bor/agent"
server.address- Host name or IP address of the server, without port. Must match a name
in the server certificate (see
server.hostnameson the server). The packaged default islocalhost. server.enrollment_port- The server's web port (enrollment and UI). Default
8443; set it to the server'sserver.enrollment_port, for example443as recommended for production. server.policy_port- Port of the mutual-TLS policy service. Default
8444. server.insecure_skip_verify- Controls only the enrollment connection (token or Kerberos). When
false, the agent verifies the server certificate against the system trust store, so you must have trusted the server CA first. Whentrue, the server certificate is not verified during enrollment and the agent logs a warning. After enrollment the setting is ignored: the agent always verifies the policy port against the CA certificate it received during enrollment. The packaged configuration file sets this totrue. Set it tofalseonce the CA is trusted; the wizard's enrollment step does that. agent.client_id- The node name. Empty means the machine's host name. It must be unique in your fleet and becomes the Common Name of the agent certificate.
enrollment.data_dir- Where the certificate, key and CA certificate are stored. Default
/var/lib/bor/agent.
The file also contains settings for policy output paths and for Kerberos, Flatpak and disk encryption. See Agent configuration for all keys.
Enroll the agent
Enrollment exchanges a one-time token for a client certificate signed by the server's internal CA. You need a token for the node group the desktop should join:
- in the wizard, as described above, or
- on Fleet -> Node Groups: open the row's actions menu, choose Generate token and click Generate Token. Copy the token from Token Only. It is shown only once.
Tokens are single-use and valid for 5 minutes. Then, on the desktop:
sudo install -m 600 /dev/null /etc/bor/enroll-token
printf '%s' 'PASTE-THE-TOKEN-HERE' | sudo tee /etc/bor/enroll-token >/dev/null
sudo bor-agent --token-file /etc/bor/enroll-token
sudo rm -f /etc/bor/enroll-token
You can also pass the token in the BOR_ENROLLMENT_TOKEN environment
variable, or with --token (deprecated: the token is visible in the process
list; the Node Groups dialog shows a sudo bor-agent --token ...
command for convenience). If several are given, --token-file wins over
BOR_ENROLLMENT_TOKEN, which wins over --token.
During enrollment the agent:
- Generates a private key and a certificate signing request.
- Sends the token and the request to
server.address:enrollment_port. - Receives its signed certificate (valid for 90 days) and the CA certificate. The server creates the node and adds it to the token's node group.
- Saves
agent.crt,agent.keyandca.crtin/var/lib/bor/agent. - Prints the next steps and exits.
Enrollment successful. Certificates stored in /var/lib/bor/agent

To enable and start the Bor agent service, run:

    sudo systemctl enable --now bor-agent
Kerberos enrollment
Desktops joined to FreeIPA or Active Directory can enroll without a token, using their machine keytab. When Kerberos is enabled in the agent configuration and the keytab exists, the agent tries Kerberos first and falls back to a token if it fails. See Kerberos enrollment.
Start the agent
At start the agent renews its certificate if it expires within 30 days, connects to the policy port and applies every policy it receives.
Verify the node
-
Follow the agent log:
A healthy agent logs
Connecting to policy stream (last_known_revision=0)...followed by the policies it applied, orReceived empty snapshot (no policies assigned)when the node's groups have no enabled bindings yet. -
In the web UI, open Fleet -> Nodes. The desktop is listed under its host name, with its node group, operating system and agent version, and is shown online while the agent is connected.
Re-enroll an agent
Re-enroll when you want to replace the agent's certificate, after restoring the server's CA from scratch, or when the node record was deleted.
- In the web UI, delete the existing node on Fleet -> Nodes. This
revokes its certificate. The server refuses to enroll a node whose name
already exists, with the error
a node named "<name>" already exists; delete it before re-enrolling. - Generate a new token and run
bor-agent --token-file ...again on the desktop. When the agent is given a token while it is already enrolled, it deletes its old certificate, key and CA certificate before enrolling. - Restart the service:
sudo systemctl restart bor-agent.
Note
The token is consumed as soon as the server accepts it, even if the enrollment then fails (for example because of a duplicate node name). Generate a new token for the next attempt.
To move a node to a different node group you do not need to re-enroll: change its group membership on the Nodes page and restart the agent so it picks up the new membership.
Deploying many desktops
- One token per desktop. Tokens are single-use and expire after 5 minutes, so a single token cannot enroll several machines. There are no multi-use tokens. Generate the token on the fly as part of each machine's deployment run.
- Use Kerberos for domain-joined fleets. With Kerberos enrollment no tokens are needed; every agent enrolls into the configured default node group.
- Automate token generation. Tokens can be generated through the REST
API (
POST /api/v1/node-groups/{id}/tokens) by an account with thenode_group:createpermission. In addition, whensecurity.admin_tokenis set on the server, the enrollment gRPC service acceptsCreateEnrollmentTokencalls authenticated with that static token in thex-admin-tokenmetadata header. - Keep host names unique or set
agent.client_idexplicitly, because the node name is the identity. - Install from the hosted repository so later upgrades come from your server with the normal package tools. See Upgrading and removing.
- Do not image enrolled machines. If you build a golden image, install the package but do not enroll it; enroll each clone after first boot. Clones of an enrolled machine share its certificate and node name.
Troubleshooting
| Symptom | Cause and fix |
|---|---|
Agent is not enrolled and no enrollment token was provided. |
Run the enrollment command with a token first, then start the service. |
enrollment RPC failed: ... certificate signed by unknown authority |
insecure_skip_verify is false but the server CA is not trusted. Run the CA trust step. |
enrollment RPC failed: ... certificate is valid for ..., not ... |
server.address is not in the server certificate. Add it to server.hostnames on the server and restart bor-server. |
enrollment failed: ... (Unauthenticated) |
The token is wrong, expired or already used. Generate a new one. |
a node named "..." already exists |
Delete the old node in the web UI, then enroll with a new token. |
Policy stream disconnected: ... reconnecting in ... repeating |
Port 8444 is blocked, the server is down, or the node was deleted (certificate revoked). Check the firewall and the server log. |
More help: Troubleshooting.